
Deploy Tailscale in Portainer docker container Raspberry pi
Lets Try
. 1 min read
I've compiled a comprehensive guide on deploying Tailscale through Portainer container (docker tailscale). Personally tested on Raspbery pi 4. While you can find scattered information on this topic elsewhere, my goal is to provide you with a consolidated resource that can potentially save you time when integrating Tailscale into your existing Docker setup.
This is a collection of bits and pieces with screenshots, that are not available anywhere else, so I hope this can help you to install tailscale in Raspberry pi.
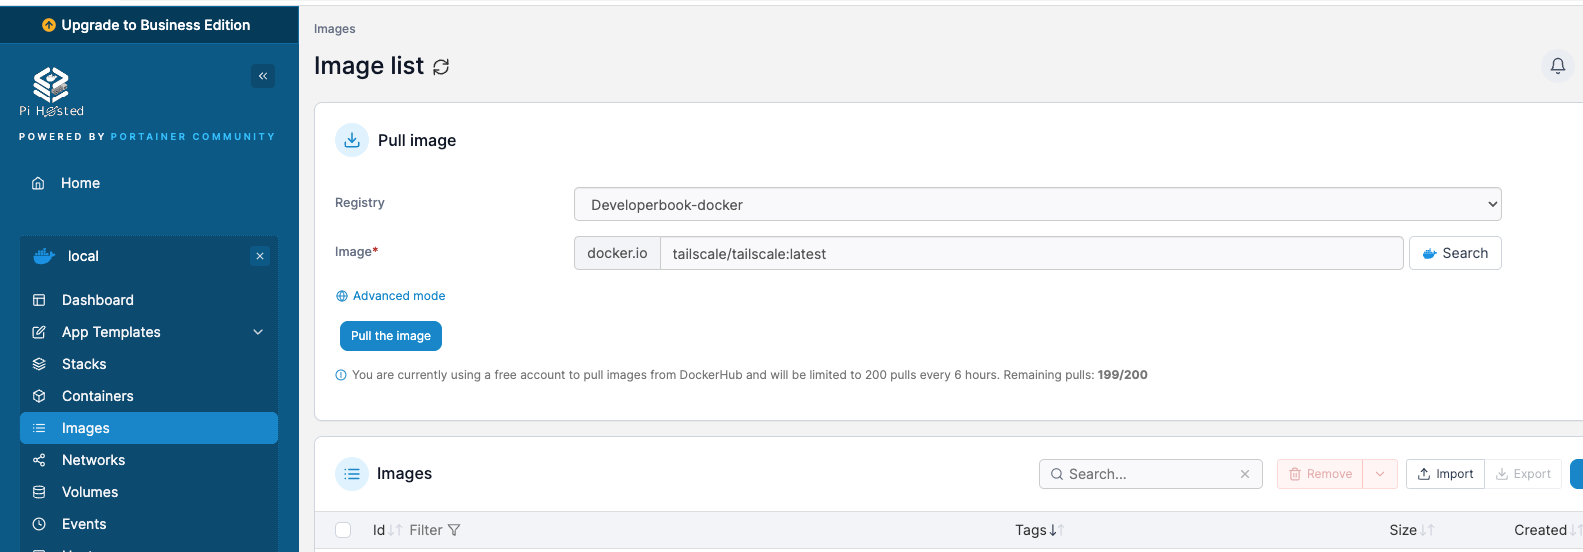
Step 1 : Pull image from docker
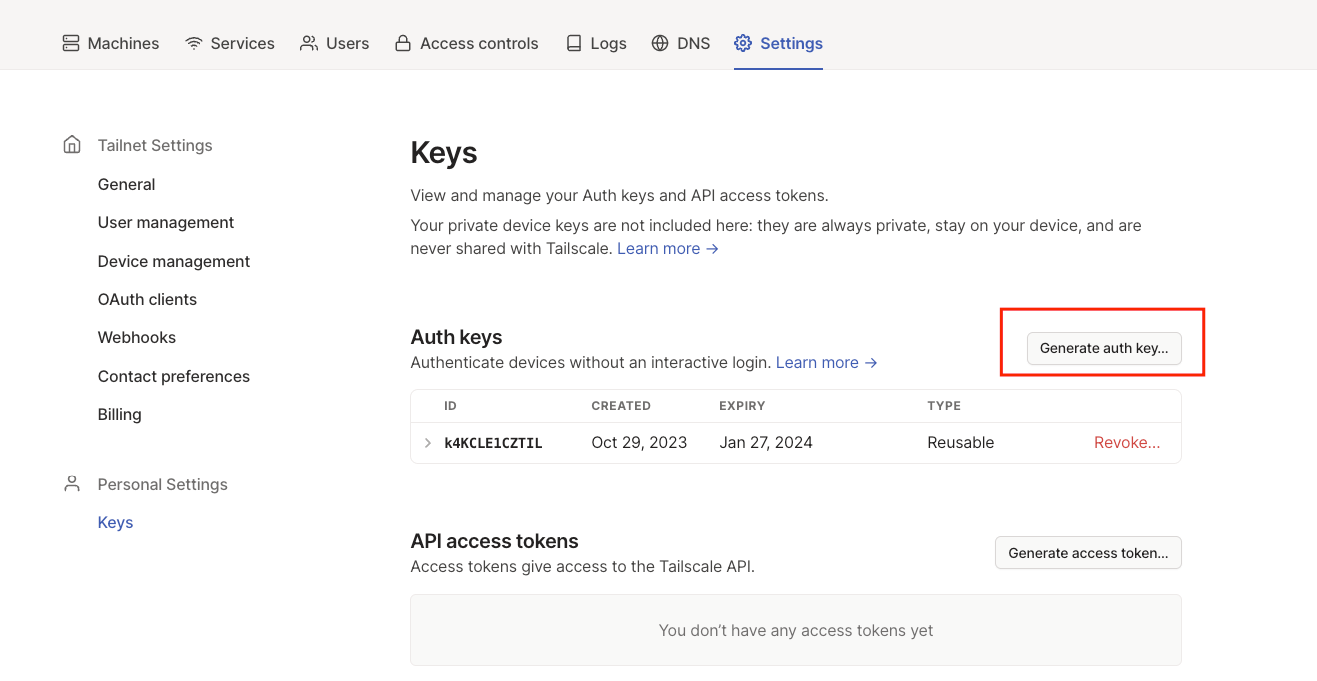
Step 2 : Generate a new Auth Key : https://login.tailscale.com/admin/settings/keys
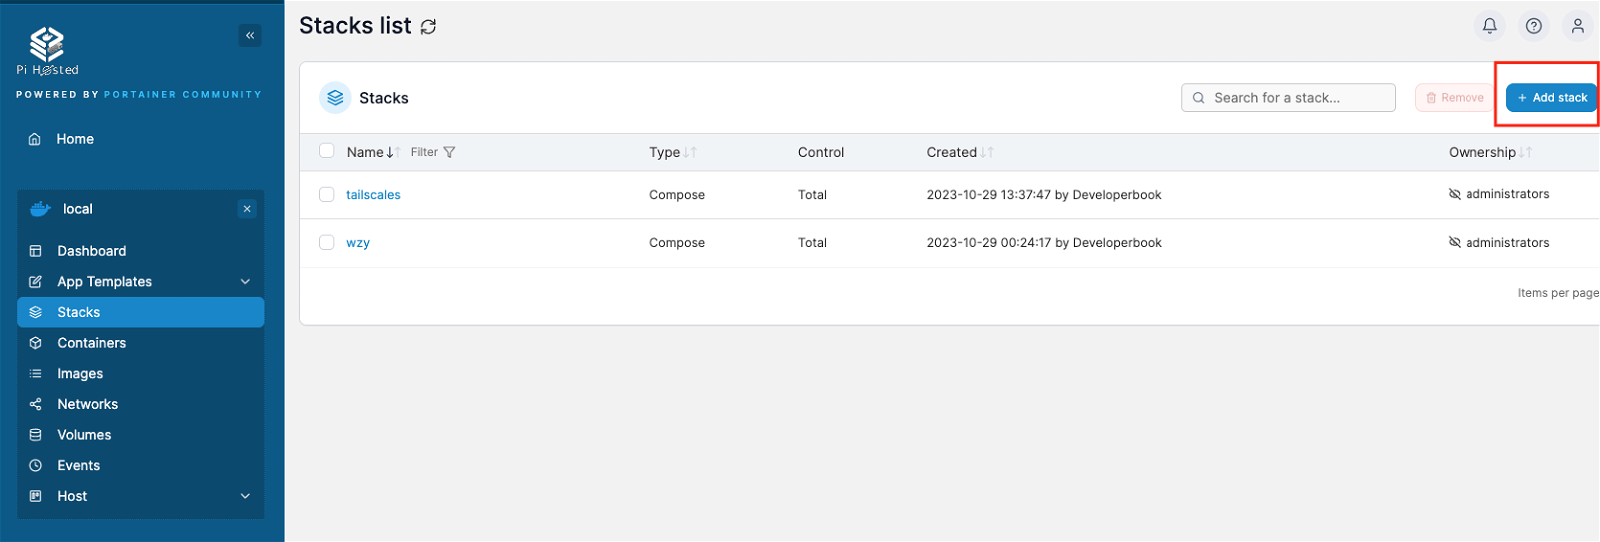
Step 3 : Create a Stack in Portainer
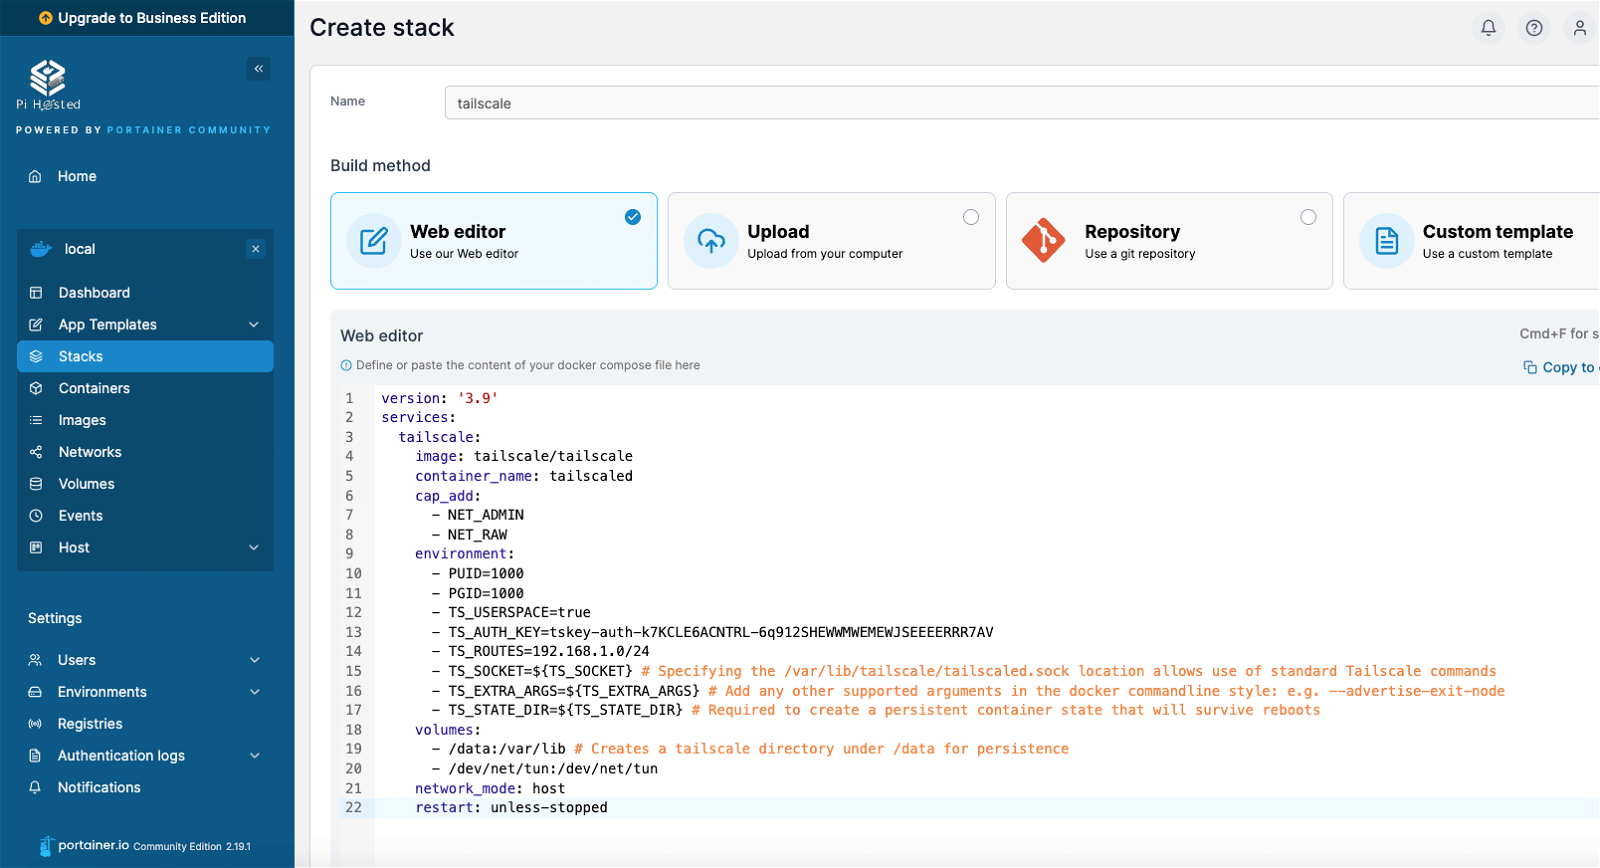
Set up the Tailscale Docker Container in Portainer:
version: '3.9'
services:
  tailscale:
    image: tailscale/tailscale
    container_name: tailscaler
    cap_add:
      - NET_ADMIN
      - NET_RAW
    environment:
      - PUID=1000
      - PGID=1000
#      - TS_HOSTNAME=${TS_HOSTNAME} # Usually not necessary for your hostname to be the same name on the tailscale network
#      - TS_ACCEPT_DNS=${TS_ACCEPT_DNS} # Set to false for Pi-hole Docker setups
      - TS_USERSPACE=true
      - TS_AUTH_KEY=YourAuthKey # Generate auth keys here: https://login.tailscale.com/admin/settings/keys
      - TS_ROUTES=192.168.1.0/24
      - TS_SOCKET=${TS_SOCKET} # Specifying the /var/lib/tailscale/tailscaled.sock location allows use of standard Tailscale commands
      - TS_EXTRA_ARGS=${TS_EXTRA_ARGS} # Add any other supported arguments in the docker commandline style: e.g. --advertise-exit-node
      - TS_STATE_DIR=${TS_STATE_DIR} # Required to create a persistent container state that will survive reboots
    volumes:
      - /data:/var/lib # Creates a tailscale directory under /data for persistence
      - /dev/net/tun:/dev/net/tun
    network_mode: host
    restart: unless-stopped
Please ensure you Inserted your authentication key in TS_AUTH_KEY, verify the volume path for the settings, and specify the TS_ROUTES (your own local ip range), which represents the subnet route(s) that this Docker container will advertise. Since we are using host networking, this container is seamlessly connected to your local area network.
Adding Environment Variables
In the Portainer-Environment section, you should define these essential environment variables:
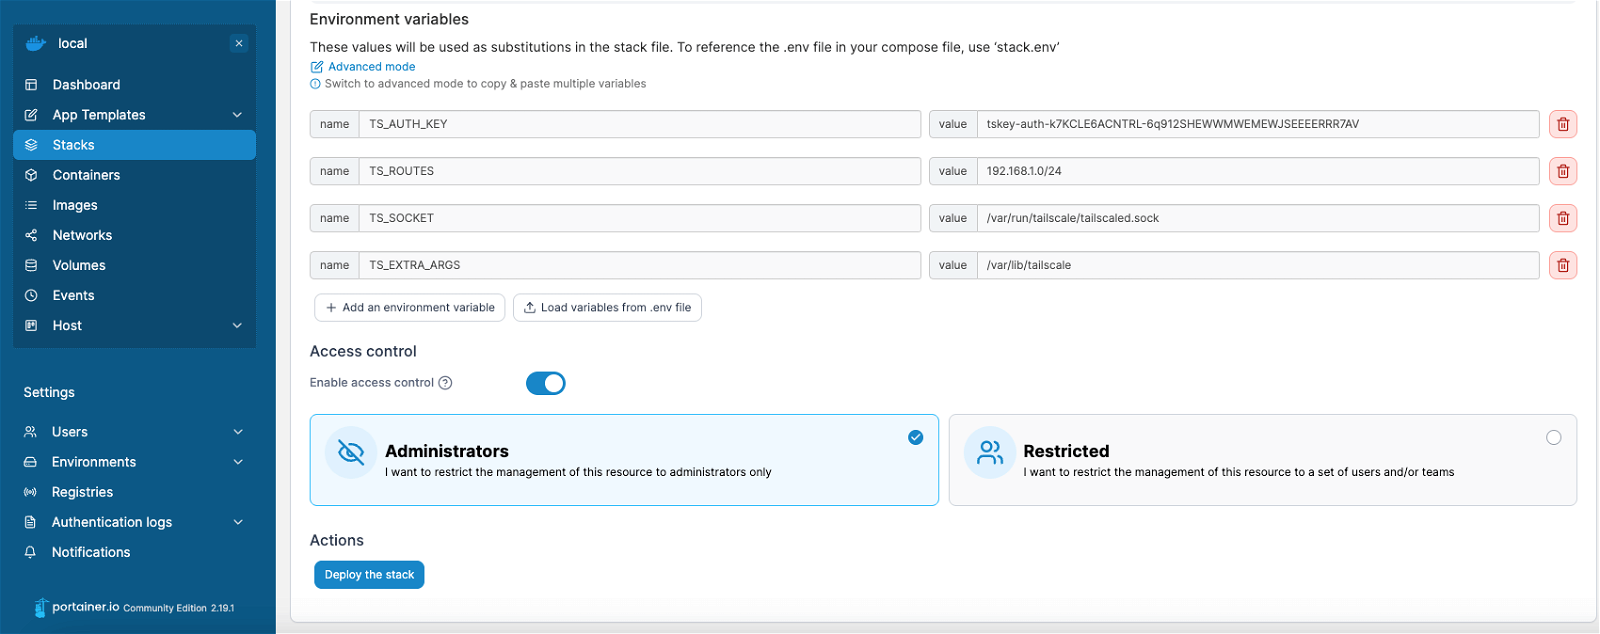
TS_AUTHKEY=YourAuthKey
TS_ROUTES=192.168.1.0/24
TS_SOCKET=/var/run/tailscale/tailscaled.sock
TS_EXTRA_ARGS=--accept-routes
TS_STATE_DIR=/var/lib/tailscale
By setting these variables, you'll gain the ability to execute commands within the container, such as "tailscale version" and "tailscale status." Furthermore, Your container will accept routes advertised by a designated node, and your setup (including authorization ) will persist across reboots.
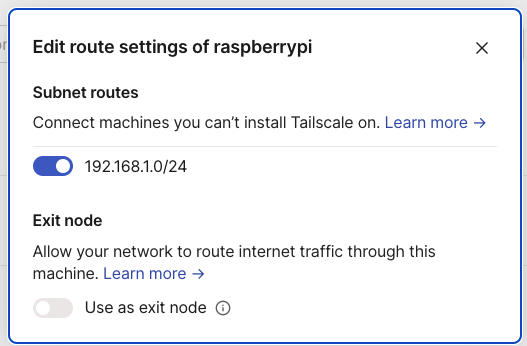
Because I ALSO want to route my subnet, it must be enabled from the Tailscale Account:
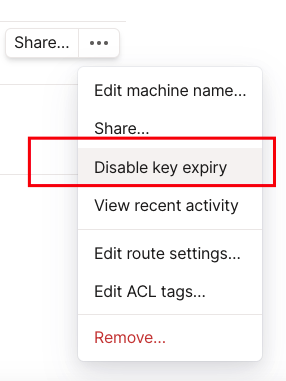
Also Disable Key expiry
Some Other source of information :
- https://forum.level1techs.com/t/truenas-scale-ultimate-home-setup-incl-tailscale/186444/1#set-up-the-tailscale-docker-container-14
- https://gist.github.com/bnhf/fed4cc3035f32a0f086b1da074a3d50b
More Stories from
Deploy Boxcoin SAAS on VPS Ubuntu Nginx Server
Looking for the fastest way to run Boxcoin Crypto SAAS on Ubuntu server? We cover the full installation process on Self-Managed VPS of webdock, hetzner, aws
Set Up Daily MySQL Backups to DigitalOcean Spaces (S3-Compatible)
Step-by-Step Guide to implement Automated MySQL Database Backup to DigitalOcean Spaces or s3 compatible buckets (With Retention & Logs) on Ubuntu server.

Raspberry Pi NAS: Install OpenMediaVault + CasaOS (Step-by-Step Guide)
Turn your Raspberry Pi into a powerful NAS by installing OMV for RAID storage and CasaOS for a simple UI—build a secure, user-friendly home cloud.

Window Server 2025 Contabo VPS Install Guide
Window server in contabo is very costly but you can deploy your license key with custom image.

Setting up SSH keys to a Ubuntu Server with Mac
Generating SSH keys on a Mac for use with an Ubuntu server is a straightforward process. Here’s a step-by-step guide: Generate the SSH Key Pair


