
Install Premium URL Shortener in DigitalOcean Cloud Server
Lets Try
. min read
All about DigitalOcean & cloud servers.
DigitalOcean is a fastest growing cloud service provider after AWS. DigitalOcean have many cloud services such as cloud server, Managed Databases, Object storages, Apps Marketplace. There cloud server cost is low but access is full (server root access) with unlimited scalability.
DigitalOcean resource Scalability option is very interesting. As you traffic grows you need more resources, To solve that problem you can increase or decrease your cloud server hardware anytime on one click from DigitalOcean dashboard. You can backup your server daily or you can take snapshot of your server anytime.
Top Cloud Server Providers
- DigitalOcean.com - Get $100 Credit Free for 60 days
- hetzner.cloud - Get €20 Credit Free
- vultr.com - Get $100 Credit Free
Why we choosing VPS cloud server rather than cPanel Shared hosting
Virtual Cloud server provides provide some dedicated resources to their customer. Those Dedicated resources include virtual CPU, Ram, bandwidth speed and quota. In cPanel shared hosting you will get shared server resources which will make your script work slow and decrease your return/profit.
What is Premium URL Shortener?
Premium URL Shortener is a PHP URL shortener script by KBRmedia. There are numerous unique features packed within Premium URL Shortener, a PHP URL shortener. In order to track and improve your marketing activities, you may utilise a short smart link to shorten a lengthy URL. Many unique options are provided to easily start a link-shortening website using this software package. To assist you get started, there are a number of tools available such as a comprehensive dashboard and admin panel, as well as a variety of CMS modules. It has been in active development for more than nine years, which means that it will continue to improve with each new release. This is a great value.
Use this script to build a URL shortening business and start making money from premium users. You may create your own internet company with this powerful script. Everything has been done for you so you can concentrate on the most crucial aspects of your project.
Installation guide - Setup your Premium URL Shortener PHP script in Cloud server
Step 1 : Choose a Cloud Server
Here we are setting up DigitalOcean cloud vps Server, $6 Monthly Ubuntu 20.04 (LTS).
Step 2 : Login Into Server
Login into server using Terminal (Mac) and Putty (windows) as Root user SSH.
Step 3 : Install Apache, MySQL, PHP (LAMP), PhpMyadmin stack on Ubuntu 20.04
i. Installing Apache
sudo apt update
sudo apt install apache2
ii. Updating the Firewall
sudo ufw enable
sudo ufw allow in "Apache"
sudo ufw allow in "OpenSSH"
sudo ufw app list
iii. Check Apache after install
http://your_server_ip/
iv. Installing MySQL
sudo apt install mysql-server
When prompted, confirm installation by typing Y, and then ENTER.
sudo mysql_secure_installation
Answer Y for yes, or anything else to continue without enabling.
If you answer “yes”, you’ll be asked to select a level of password validation. Keep in mind that if you enter 1 for the Medium level, you will receive errors when attempting to set any password which does not contain numbers, mixed case, and special characters. In My installation i used Medium.
For the rest of the questions, press Y and hit the ENTER key at each prompt. This will remove some anonymous users and the test database, disable remote root logins, and load these new rules so that MySQL immediately respects the changes you have made.
v. Installing PHP
sudo apt install php libapache2-mod-php php-mysql

php -v
vi. Creating a Virtual Host for your Website
Create the directory for your_domain as follows:
sudo mkdir /var/www/html/your_domain
Next, assign ownership of the directory with the $USER environment variable
sudo chown -R $USER:$USER /var/www/html/your_domain
Then, open a new configuration file in Apache’s sites-available directory using your preferred command-line editor.
sudo nano /etc/apache2/sites-available/your_domain.conf
This will create a new blank file. Paste in the following bare-bones configuration:
<VirtualHost *:80>

    ServerName your_domain

    ServerAlias www.your_domain

    ServerAdmin webmaster@localhost

    DocumentRoot /var/www/html/your_domain

    ErrorLog ${APACHE_LOG_DIR}/error.log

    CustomLog ${APACHE_LOG_DIR}/access.log combined

</VirtualHost>
Save and close the file when you’re done. If you’re using nano, you can do that by pressing CTRL+X, then Y and ENTER.
You can now use a2ensite to enable the new virtual host:
sudo a2ensite your_domain
To make sure your configuration file doesn’t contain syntax errors, run:
sudo apache2ctl configtest
Finally, reload Apache so these changes take effect:
sudo systemctl reload apache2
Note: Replace your_domain with your own domain name
vii. Installing phpMyAdmin
phpMyAdmin is web App for Managing MySQL databases.
sudo apt update
sudo apt install phpmyadmin php-mbstring php-zip php-gd php-json php-curl
Here are the options you should choose when prompted in order to configure your installation correctly:
- For the server selection, choose
apache2<$>[warning] Warning: When the prompt appears, “apache2” is highlighted, but not selected. If you do not hitSPACEto select Apache, the installer will not move the necessary files during installation. HitSPACE,TAB, and thenENTERto select Apache. <$> - Select
Yeswhen asked whether to usedbconfig-commonto set up the database - You will then be asked to choose and confirm a MySQL application password for phpMyAdmin
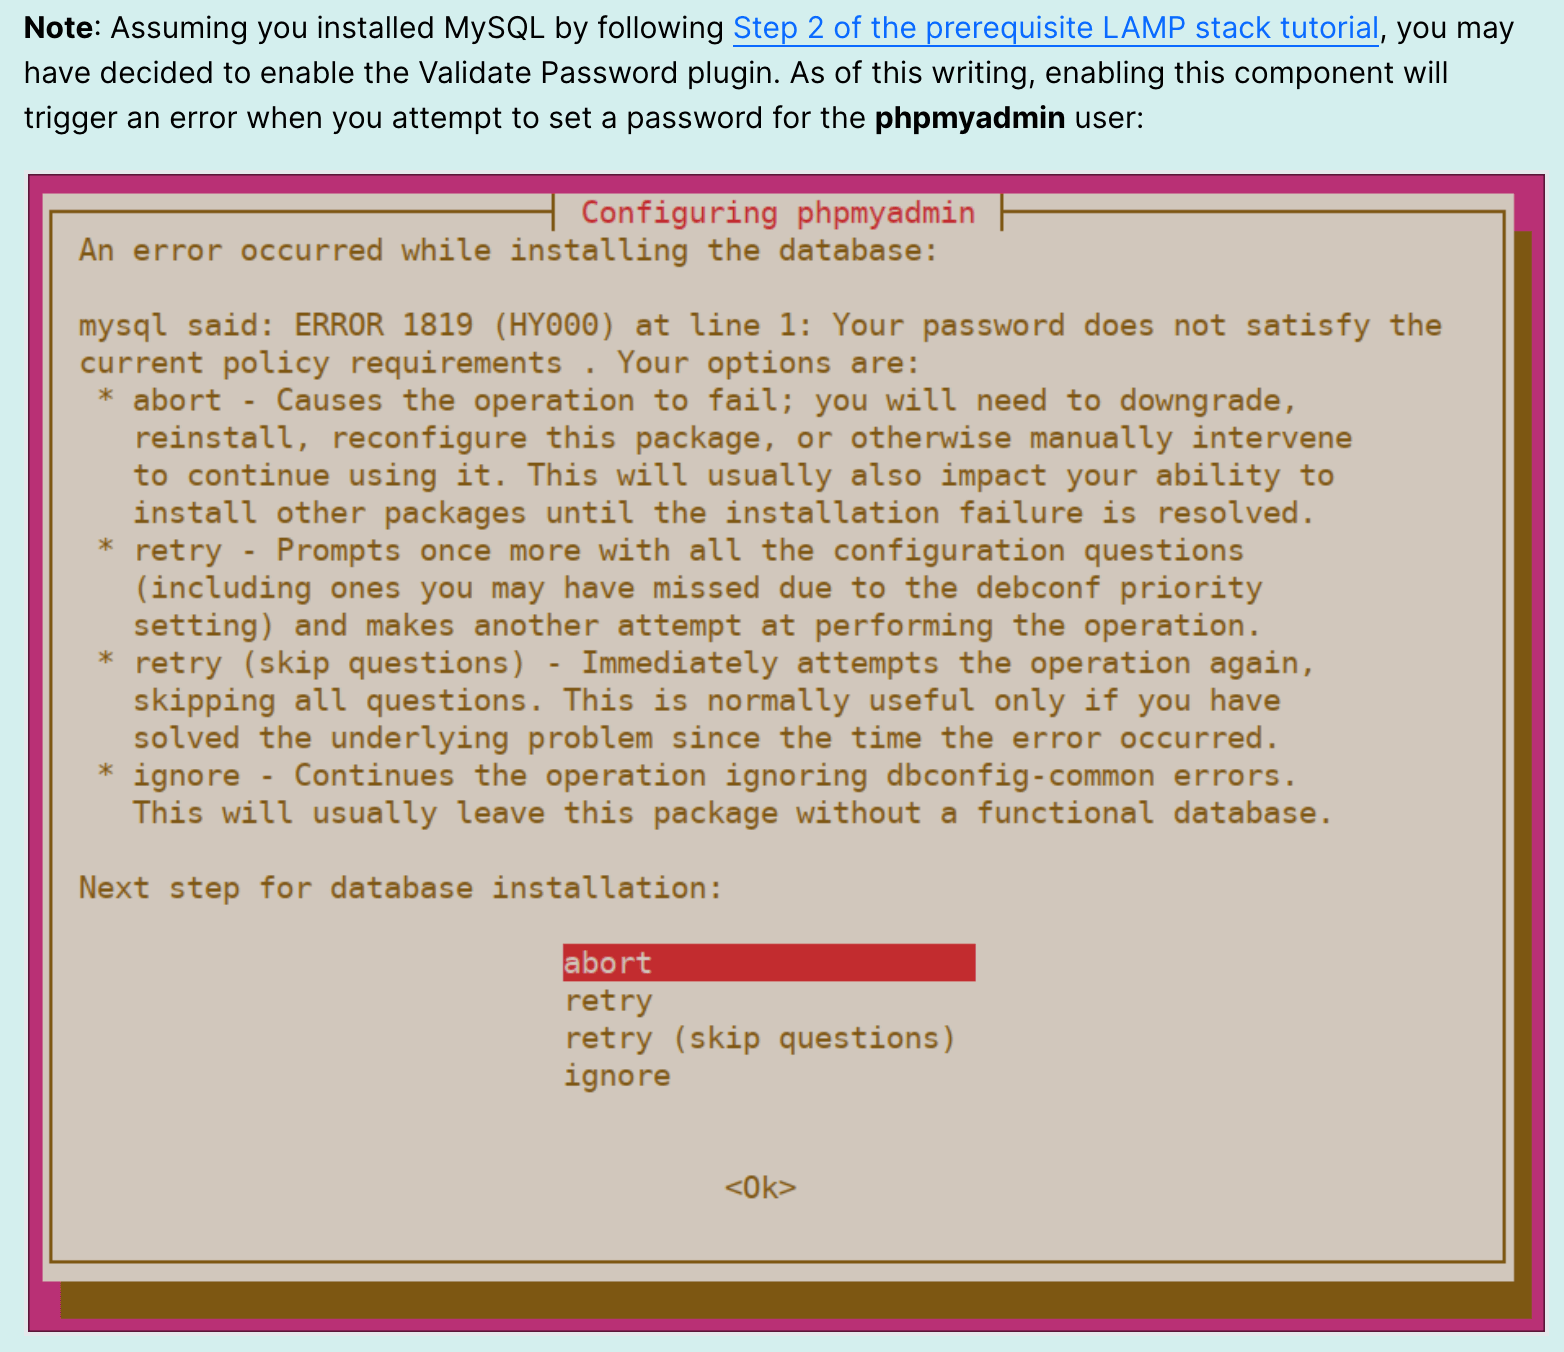
To resolve this, select the abort option to stop the installation process. Then, open up your MySQL prompt:
mysql -u root -p
From the prompt, run the following command to disable the Validate Password component. Note that this won’t actually uninstall it, but just stop the component from being loaded on your MySQL server:
UNINSTALL COMPONENT "file://component_validate_password";
Following that, you can close the MySQL client:
exit
Then try installing the phpmyadmin package again and it will work as expected:
sudo apt install phpmyadmin
Once phpMyAdmin is installed, you can open the MySQL prompt once again with mysql -u root -p and then run the following command to re-enable the Validate Password component:
mysql -u root -p

INSTALL COMPONENT "file://component_validate_password";
The installation process adds the phpMyAdmin Apache configuration file into the /etc/apache2/conf-enabled/ directory, where it is read automatically. To finish configuring Apache and PHP to work with phpMyAdmin, the only remaining task in this section of the tutorial is to is explicitly enable the mbstring PHP extension, which you can do by typing:
sudo phpenmod mbstring

sudo a2enmod rewrite
Afterwards, restart Apache for your changes to be recognized:
sudo systemctl restart apache2
You can now access the web interface by visiting your server’s domain name or public IP address followed by /phpmyadmin:
https://your_server_IP/phpmyadmin
Step 4 : Installing Premium URL Shortener Script is your Server
- Download Latest version of Script from https://codecanyon.net/item/premium-url-shortener/3688135
- Unzip the downloaded file
- Find Main.zip file and upload that zip file into your created directory
/var/www/html/your_domainusing filezila - Unzip Main.zip file using commandline (first change directory and then unzip)
cd /var/www/html/your_domain

unzip main.zip
- Create Database and Database User (using phpMyAdmin)
- Give Permission to file and folder
The file config.php, storage/ folder and the public/content folder are to be writable. You can run the commands below
chown -R www-data:www-data config.php
chown -R www-data:www-data storage
chown -R www-data:www-data public/content
Note- Run above commands in /var/www/html/your_domain directory
- Open your_domain in browser Now and follow the script installation steps one by one
- It's All done
Step 5 : Adding Swap Space on Ubuntu 20.04 (optional)
Swap Space is also known as Swap memory. Creating Swap Space is very helpful when your Server RAM is occupied very fast. Your diskspace will be used as RAM.
When the operating system can no longer keep the data it needs in RAM, it can store it on a specified space on the hard drive known as Swap. Essentially, this allows you to expand the amount of data your server can hold in working "memory," but there are certain restrictions. When RAM runs out of room to store currently-used programme data, the hard drive's swap partition is called upon.
Although data written to disc is slower than data stored in RAM, the operating system prefers to keep running applications in memory and use swap for the older data. To avoid out-of-memory issues on systems with non-SSD storage, having a swap space to fall back on can be a good idea overall.
- Create a Swap File
Since the server in our example has 1GB of RAM, we will create a 3 Gigabyte file in this guide. Adjust this to meet the needs of your own server:
sudo fallocate -l 3G /swapfile
- Enabling the Swap File
Make the file only accessible to root by typing:
sudo chmod 600 /swapfile
We can now mark the file as swap space by typing:
sudo mkswap /swapfile
After marking the file, we can enable the swap file, allowing our system to start utilizing it:
sudo swapon /swapfile
We can verify that the swap is available by typing:
sudo swapon --show
We can check the output of the free utility again to corroborate our findings:
free -h
- Make the Swap File Permanent
Our recent changes have enabled the swap file for the current session. However, if we reboot, the server will not retain the swap settings automatically. We can change this by adding the swap file to our /etc/fstab file.
Back up the /etc/fstab file in case anything goes wrong:
sudo cp /etc/fstab /etc/fstab.bak
You can add the swap file information to the end of your /etc/fstab file by typing:
echo '/swapfile none swap sw 0 0' | sudo tee -a /etc/fstab
- Adjusting the Swappiness Property
We can see the current swappiness value by typing:
cat /proc/sys/vm/swappiness
For a Desktop, a swappiness setting of 60 is not a bad value. For a server, you might want to move it closer to 0.
We can set the swappiness to a different value by using the sysctl command.
For instance, to set the swappiness to 10, we could type:
sudo sysctl vm.swappiness=10
This setting will persist until the next reboot. We can set this value automatically at restart by adding the line to our /etc/sysctl.conf file:
sudo nano /etc/sysctl.conf
At the bottom, you can add: /etc/sysctl.conf
vm.swappiness=10
Save and close the file when you are finished.
- Adjusting the Cache Pressure Setting
Another related value that you might want to modify is the vfs_cache_pressure. This setting configures how much the system will choose to cache inode and dentry information over other data.
Basically, this is access data about the filesystem. This is generally very costly to look up and very frequently requested, so it’s an excellent thing for your system to cache. You can see the current value by querying the proc filesystem again:
cat /proc/sys/vm/vfs_cache_pressure
As it is currently configured, our system removes inode information from the cache too quickly. We can set this to a more conservative setting like 50 by typing:
sudo sysctl vm.vfs_cache_pressure=50
Again, this is only valid for our current session. We can change that by adding it to our configuration file like we did with our swappiness setting:
sudo nano /etc/sysctl.conf
At the bottom, add the line that specifies your new value: (File - /etc/sysctl.conf )
vm.vfs_cache_pressure=50
Save and close the file when you are finished.
More Stories from
Deploy Boxcoin SAAS on VPS Ubuntu Nginx Server
Looking for the fastest way to run Boxcoin Crypto SAAS on Ubuntu server? We cover the full installation process on Self-Managed VPS of webdock, hetzner, aws
Set Up Daily MySQL Backups to DigitalOcean Spaces (S3-Compatible)
Step-by-Step Guide to implement Automated MySQL Database Backup to DigitalOcean Spaces or s3 compatible buckets (With Retention & Logs) on Ubuntu server.

Raspberry Pi NAS: Install OpenMediaVault + CasaOS (Step-by-Step Guide)
Turn your Raspberry Pi into a powerful NAS by installing OMV for RAID storage and CasaOS for a simple UI—build a secure, user-friendly home cloud.

Window Server 2025 Contabo VPS Install Guide
Window server in contabo is very costly but you can deploy your license key with custom image.

Setting up SSH keys to a Ubuntu Server with Mac
Generating SSH keys on a Mac for use with an Ubuntu server is a straightforward process. Here’s a step-by-step guide: Generate the SSH Key Pair


